An Introduction to Sitecore Pipelines

What is a Sitecore Pipeline?
In Sitecore pipelines describe a series of discrete steps that are taken to achieve some objective. If you think about writing code to handle an HTTP request for example you could create a monolithic class that does the job from end to end; however the pipeline approach is a number of classes that can be invoked in order. First do this and then do that etc.
There are many Pipelines in Sitecore. You can view existing pipelines and the processors that they call using Sitecore Rocks in Visual Studio. Right click on the site connection and choose Manage. Click on the Pipelines tab in the Visual Studio edit pane. Click on one of the listed pipelines to see all the processors that are executed as part of the pipeline. There are pipelines with a single processor at one end of the scale to the httpRequestBegin pipeline with 45 distinct steps at the other.
Why are they useful?
Thinking about the monolithic class above it would be very difficult to maintain or modify, It would also be truly massive. So modularising it would make it much easier to maintain.
It also makes it much easier to customise. For example, if we consider a pipeline that has three processors it might be drawn something like

To add to the existing functionality we could include a new step like
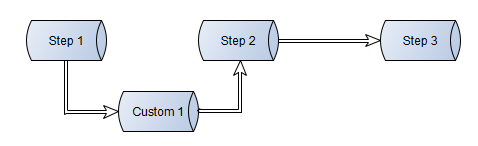
Where we add some custom function after Step 1 and before Step 2.
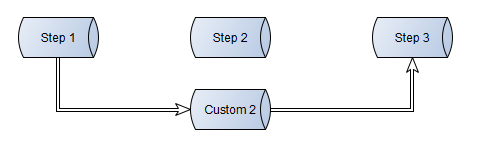
We could also replace an existing step completely
How are they defined?
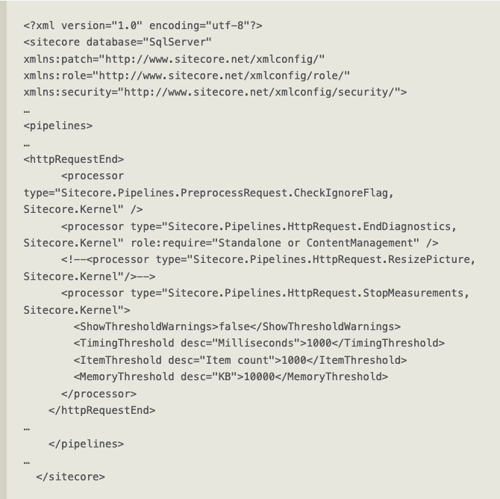
Pipelines are defined using XML in sitecore.config. In the example below we can see the httpRequestEnd pipeline definition. The three processors are called in the order in which they are listed. A parameters object is passed between them to provide continuity. The final processor is also receiving four additional parameters from the config file.
How can I work with Sitecore Pipelines?
Existing Sitecore pipelines can be customised as outlined above and it is also possible to create a brand new pipeline from scratch.
Customise existing Pipelines
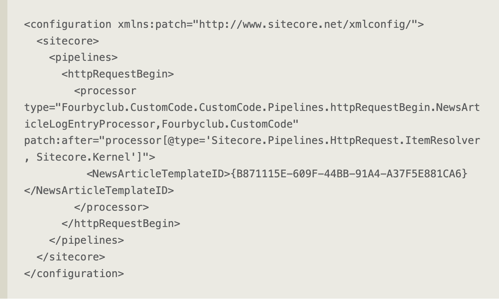
First thing to do is to create a configuration patch to add the new processor class into the pipeline at the desired location. As you can see from the code it is possible to pass variables to the processor. Here we are adding a processor called NewsArticleLogEntryProcessor into the httpRequestBegin pipeline after the ItemResolver
Then we need to create the processor. Inherit the HttpRequestProcessor and Implement the Process method. All we are doing here is writing to the log if the requested item is a NewsArticle.

Create a new Pipeline
To create and new pipeline is a little more work but still very simple. The first thing to do is to declare the pipeline with a configuration patch

The XML above will create a pipeline called logWriter that has a single processor called logWriterProcessor, which will be in the Fourbyclub.CustomCode.dll.
Pipelines must pass a PipelineArgs object to each processor as it is called so that needs to be defined

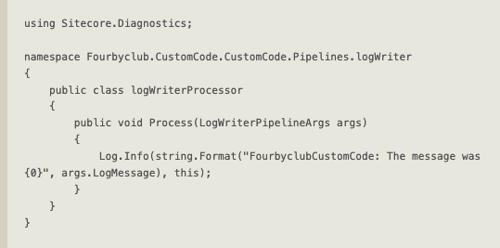
At least one processor is needed to do the work of our pipeline
Finally we need to invoke the pipeline in our code somewhere. Instantiate the LogWriterPipelineArgs and set the LogMessage. Then call CorePipeline.Run and pass it the name of the pipeline and the args.object

Conclusion
Thank you for reading and I hope that this short introduction to Sitecore Pipelines has shown the power of pipelines to customise Sitecore and help to build maintainable code. However we should always check if there is a way we can implement something using existing Sitecore functionality rather than going for a pipeline as a first resort. As with any customisation does each pipeline or processor added have a potential to increase the challenge of Sitecore upgrades?
We are always looking for the brightest Sitecore minds, if that's you, contact us today!